
Tuesdays have now become my official tip-sharing day on my photoblog! You know... "T", for tip and Tuesday. Clever, I'd say. :) I thought of trying to give it a cute name, but the only thing that came to mind at this hour was "Tipsy Tuesday", and that isn't going to do! So, I guess I'll settle for just "tip". Yeah, I know...unique and so exciting. :D
Well, onto the tip of the week, DE-FOGGING!
Unless you own an expensive lens, this is a very important tip to learn and will add some punch to your photos from the get go. From what I've learned, most digital cameras give off a "haze" in photos. Removing this haze is called de-fogging. By de-fogging, you will increase the contrast in larger parts of the picture (not sharpening the details), in effect giving it a more clean, vibrant look.
De-fogging is the first thing I do to my photos after I've downloaded the originals to my computer. Here's what you do. It will only take a minute!
In Photoshop, go to Filters -> Sharpen -> Unsharpen Mask and enter these numbers:
- Amount: 20
- Radius: 60
- Threshold: 0
Click OK and you're done. Yep, that's it. Easy as pie!
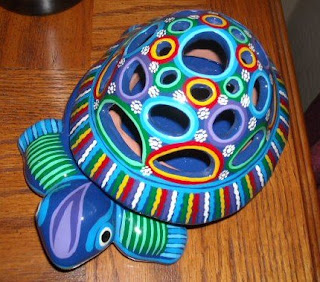
Below are a couple of examples. The top photos are the originals. The second photos are de-fogged. You will notice that the de-fogged photos are more defined and not as flat. You may need to view them in full-size and next to each other to better see the difference. Believe me, it's quite noticeable. :) HTH!
.jpg)
.jpg)
.jpg)
.jpg)


